Sunday, 28 February 2016

Defending Their Honour

(or something?)

I promise that I'm still working on finishing my recap from my mini-clinic with Sandra. I had a trainer ride which was super informative, and learned a number of new exercises which I have been using. It's been a busy week and getting it all written down and organized is just taking a little longer than I planned. In the meantime...

Do you ever find yourself over-zealously defending your horse from insults?

Someone told me that Kachina had bad ground manners the other day. This is basically true. We have done a lot of work on ground manners and have made some improvement, but we have a ways to go. Kachina isn't mean in the slightest, and respects your space most of the time. However, for her, forward motion is usually the answer to everything. If you put her in a situation where you don't leave any forward options open, i.e. blocking her path to get her to stop or back up, she doesn't always listen and will try to keep going forward regardless. This is basically what happened when the person offered to hold Kachina for a minute while I grabbed something.

Despite this truth, when I heard "She doesn't have very good ground manners does she?", I immediately found myself denying it. I ended up replying by saying something like "well, she isn't used to being handled much by people other than me". While that is technically true, it doesn't really have anything to do with the issue.

For the next few minutes I found myself being grumpy and thinking to myself about the ways that Kachina was better than their horse. I am glad that I realized that these were illogical, jerk thoughts that I was having, and I got over it without putting my foot in it (too badly). The fact remains though that I had such a strong negative reaction to someone insulting my horse. Kachina doesn't care that someone insulted her ground manners, why do I?

She's also not very good at makeup application.
A little too heavy on the eyeshadow and lipstick there Kachina ;)

It almost felt like that kid sibling reaction: "I'm the only one who's allowed to insult my brother, if you say anything bad about him, I'll beat you up!"

How do you feel when someone says something negative about your horse?

Wednesday, 24 February 2016

Mini Clinic with Sandra

This past weekend I had another Dressage Weekend, but this one was with my Kachina!

I'm calling it a mini-clinic, because that's kind of how it was formatted for me, but it wasn't actually a formal clinic. I just arranged with Sandra for me and a friend to haul up for a few lessons.

Both Kachina and KD's pony were excellent about loading and hauling despite the fact that this was their first trip in several months.

Saturday Lesson on Kachina


The main theme of this lesson was summed up by this quote of Sandra's (as close as I can remember it): "lateral work is the key to unlocking this horse longitudinally".

Kachina was surprisingly chill and relaxed in the new place and we had an easy warm-up.

I have video of this ride. Unfortunately the video does not look near as nice as the ride felt. We worked on so many things, and I never got all of them right at the same time. Even when I take stills from the video, Kachina will look nice in one moment where I look like crap, or vice versa. I'm including some stills showing some of the good, the bad, and the ugly.

We spent a lot of the lesson in a 20m circle, doing 10m circles within the big circle, at each of 4 points around a pylon. The purpose of the little circles wasn't to have them perfectly sized or shaped, but using them to really get Kachina's body on a bend from nose to tail with my legs influencing the position of her rib cage. Then we were to keep that bend and feeling on the large circle until we got to the next small circle. 

Circle exercise - 20m circle with 10m circles within

We did this exercise at both the walk and the trot. The walk work is not bad, but we run into a lot more problems at the trot.

Nice walk, decent position for me

My toes are turned out, but I can keep my legs on at the walk.
I've been working hard on this.
This is our stretchy walk

I mentioned before that in my last couple rides I had been introducing shoulder-in and it seemed to be helping hugely with being able to get Kachina to relax, and push up into contact. With Sandra's help, we identified in this lesson that when I influence Kachina laterally, that's when she softens over her back and becomes "through". As Sandra explained, there are two major categories that horses can fall into. For some horses, you must get them forward in front of your leg before you can successfully move onto anything else. For other horses, you have to unlock them laterally before you can do anything else. Kachina falls squarely into the second camp.

Starting the trot work - pretty good, but not asking for much here

Kachina has a tendency to start rushing and increase her tempo while swinging her head up and hollowing her back (giraffing). Instead of pulling back on the reins, we worked on using the small circles and influencing her ribcage to bring her back while keeping soft on the reins.

When I start to put my leg on, she turns into a running giraffe

Further giraffing tricks me into leaning forward  and pulling the reins, not helpful!

Okay, we've gotten through the giraffe stage and things are looking better
Unfortunately, the curling stage is coming up...

Kachina will either giraffe, or else stretch her neck down but curl behind the vertical. (She will also tilt her head sideways, but I'll go into that more next post). Neither is obviously ideal. However, Sandra said that when Kachina is curling down with her head, at least she's using her back better than when she's hollow and high-headed. This means that while we still won't be aiming for that position, for now I shouldn't worry about her curling back too much. It's most important to get the body and back working right now and then we can adjust the head position later. This is kind of tough for me as I hate seeing horses going around behind the vertical, but I need to accept that it's not the most important issue and we'll address it in due time.

These three screenshots were taken at half stride intervals.
They show how much she curls her nose back and tips her head,
but then we can get a better frame fairly quickly.
My reins are almost floppy in the first two shots, I am not
pulling her head in like that at all.

Sandra introduced the idea of the "100% rule". When the horse is where we want them (100%), we need to immediately soften to tell them that's what we want. Softening may likely cause the horse to lose the position. We need to reapply the aid at or before the horse gets down to 75%. If we wait until the horse is down to 50%, then it might take us several circles to get back to 100% instead of just a few strides. Basically this means that we need to immediately reward correct behavior, but then ask again for it relatively quickly if needed so the horse doesn't fall apart too much in between. 

Another thing Sandra talked about is how a half halt should only be the length of half a stride. Apparently a big difference between European and North American riders is that we tend to hold on for far too long. In Europe, dressage students are taught from a young age that they only have half a stride to influence the horse's mouth and then they have to get out of there. This is something I need to work on for sure.

I'm leaning forward and pulling on the reins for too long
Better position and contact, but not enough bend for the exercise
We also worked on my leg position. When Kachina starts running, I instinctively take my legs completely off her sides. I need to keep my legs in contact with her all the time, and actually use my legs a lot more than I do. My toes also turn out terribly, I know that already, but we worked on that some more. When I was focused on my legs, I lost my seat, so then I had to think about leaning back and sitting in the saddle.

Blurry, but you can really see how my
lower legs are off and my toes pointed
out. The right side is worse than the left.


We did some canter work too. I worked on keeping my upper body quiet during the transitions. Considering that it's only been a few rides since I started teaching Kachina the "proper" canter aid, it's already getting better. We then tried to get that bent around my leg feeling a bit while at the canter. We only achieved this a tiny bit, but we'll get there. Sandra generally agreed that my approach of trying to make the canter "no big deal" for Kachina by not worrying too much about the transitions up or down has been good to this point, but I can now start asking her to stay in the canter for a little longer until I can get a down transition more on my terms.

Canter - where I really take my legs off
After canter, we went back to the circle exercise at the trot. Towards the end of the lesson we were starting to get the hang of it and things felt better. Unfortunately though, this was when my camera memory reached capacity so I don't have any media for the end of the ride.

This is the moment right before my camera cut out for the day. My position isn't
great but I am able to bend Kachina's ribcage around my inner leg and she is soft
both laterally and longitudinally.

Tuesday, 23 February 2016

Sneak Peak

I have a few posts in the works, both on this past weekend and on tack, but I need another day or two to get the photos and videos sorted out.

The weather has been really nice and decidedly not-wintry for the last couple weeks so the plan to haul up to Calgary looked solid. Then on Friday morning I woke to find a couple inches of white wet stuff on the ground. It wasn't much, but it was just that perfect wrong temperature where it was a slushy mess that was freezing to the roads and making driving terrible. Prospects of hauling did not look good.

Icier than it appears


Luckily, the roads cleared in time, and we were able to leave Saturday morning with no issues :)

It was an awesome weekend. Kachina was surprisingly chill at a new place. I learned a lot of things to work on at home. I got some good feedback on Kachina's strengths and weaknesses. I also had a lot of fun!

Good pony


More details to come.

Friday, 19 February 2016

A Different Pyramid

Warning: This post is going to be seriously philosophical/sociological, but if you hang in there, it does relate back to horses and why we ride.

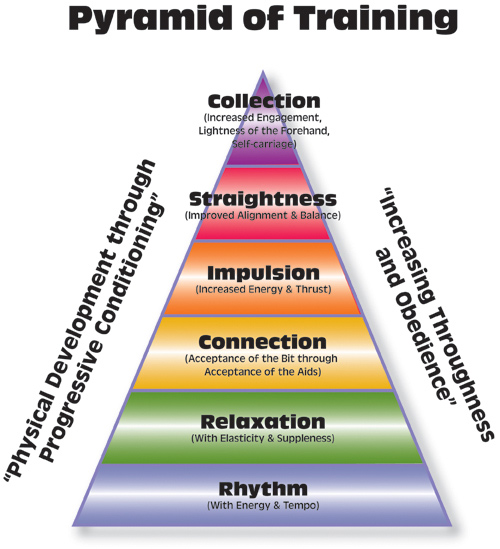
Okay, we know about the dressage training pyramid...

Image Credit: USDF website

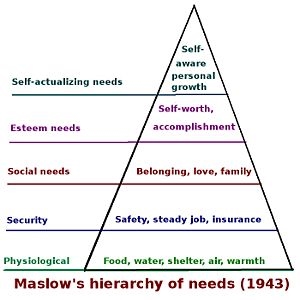
...but today I want to talk about a different pyramid, Maslow's Pyramid of Needs.

If you're anything like me, you learned about this in Grade 7 or so and haven't really thought about it since.

I was in a management course for work this week. I don't actually manage anyone so the reason for my enrollment is a bit questionable, but my boss told me to go so I went. Anyways, at this course one thing that came up was Maslow's Pyramid of Needs and how it relates to motivation of employees at companies.

File:Maslow hierarchy of needs.jpg
Image Credit: by Tomwsulcer from Wikipedia Commons

The Cole's notes are this:
  • The pyramid has 5 levels. The bottom level is physical needs: food, water, air, etc. The second level is safety and security needs. Third is social needs. Fourth is ego needs. Fifth is fulfillment or self-actualization needs.
  • The bottom levels have to be met before we care about the upper levels. i.e. if you are physically starving, food is the priority and you don't care about your ego.
  • Only an unmet need motivates us. i.e. we aren't motivated by oxygen until we don't have it.
  • For the average employed person in the first world, we have the first three levels of needs (physical, safety, social) fairly well met. 
The course went on to talk about how that means that managers need to try and use the top two levels of the pyramid to motivate their employees to work to their full potential. (i.e. use respect, appreciation, etc. to motivate, not more money or job security).

Okay you're probably wondering where the horses come in, here we go:

As part of all this, there was one part of the course where it mentioned that people who are unhappy with their jobs can turn to hobbies to meet their ego and fulfillment needs. I don't necessarily agree that people only turn to hobbies if they hate their jobs. However, the connection between hobbies and the pyramid of needs was the part that I found really interesting and got me thinking...

  • How do horses help us meet our ego and fulfillment needs? Is it the feeling of accomplishment? Is it the feeling of growth and improvement? Something else?
  • It's kind of funny to think that on a base level we might ride to fulfill an "ego" need when we all know how humbling horses can be.
  • Do we ride to fill any needs lower on the pyramid? Is it a social thing? (Social with the horse or social with other horse people?) Does knowing how to control a large animal give us some caveman sense of security?
  • I don't know many riders who turned to horses because they thought "hey, I don't find my work satisfying enough, I need something else." More often it seems like horses are a grand passion that we pick up in youth and then can't get rid of it. Does this mean we look for less needs to be met by our jobs when we have them met by horses?
  • How do other hobbies compare to riding when it comes to what needs they meet?
  • Not all hobbies seem to be equal when it comes to how all-consuming they are. Is there a fundamental difference between hobbies that lead to meeting some need (like a feeling of accomplishment or of growth and improvement) such as sports, riding, music, art, etc, vs. a past-time that is really just used to pass the time such as watching television, surfing the internet, reading (for fun, not learning), etc. Would you classify these differently than I did?
  • If a feeling of accomplishment or improvement is needed to make riding a hobby that meets upper pyramid needs, does that mean pleasure riding (where you aren't trying to train, improve, etc) is a different thing and more a passive past-time?
  • Are people with a serious hobby less successful at work than people without one?
No ribbon but a serious sense of accomplishment
after this ride (for completing test and not dying)!


There's also considerations unrelated to horses as a hobby:
  • How does the pyramid of needs for humans compare to that of horses? Do horses have needs beyond the first three levels?
  • The comparisons between the dressage pyramid of training and the Maslow pyramid are interesting. Both are shown as a pyramid or hierarchy. Both of them require you to have lower levels in place before you can master upper levels. Also in both of them the order isn't always so clear cut and you may need to jump down and then up again as required. 
What are your thoughts?

P.S. If anyone doing a Masters in Sociology or whatever wants to steal any of these questions for their thesis, please do, just send me your results please! ;-)

Thursday, 18 February 2016

Blog Hop: The Little Things

bloghoplogo

What are the “little things” about your horse that you’re so fond of?

Here are the things I appreciate about Kachina:

1. I can load her in the trailer by myself


This is huge. Most of the times that I need to haul, I'm by myself at the barn. The knowledge that I can get her on the trailer by myself in less than 10 minutes (that was the longest ever, usually it's less than 1 minute) anytime is awesome. Even when it's pitch black outside. It also means I don't need to leave an hour early all the time "in case I have trouble loading".


2. Polite with treats


We've been using treats for clicker training and to build positive associations with things she doesn't like (like standing tied in the scary barn). Despite me frequently having treats in my pocket, she never mugs me and always takes it politely from my hand when offered. I appreciate this.


3. Babysitter on the trail


I think I love this so much about Kachina because with my old horse I was the one who needed a trail babysitter. I can go out in the fields with Kachina and any other horse and know we'll be okay. The other horse needs to lead, or follow? No problem, Kachina is fine anywhere in the pack. We need to stop or circle while the other horse freaks out? Okay, we can do that. We need to alter our natural speed to match the other horse's slow amble or charging walk? We can do that too. The other rider needs to put their horse's head up Kachina's butt to stop them from running off? She doesn't even get phased by that! 
Because Kachina is such a good babysitter, we have more friends we can trail ride with, and that makes us both happy.


4. We can walk


We have days where we can't trot or canter without getting fast or freaked out. But no matter what kind of day we are having, I can always take things down to the walk and have a good place that we can gather ourselves at or end on a good note with.

Thanks Kachina!

Tuesday, 16 February 2016

Day-to-Day Reality

In the interest of being honest and not appearing to talk a bigger game than I play, here's a recap of my latest ride:

I did 20m circles at the walk, trot, and canter.

My dressage court, complete with barrels of course


Yes, I was working on getting proper bend, keeping the circles round, maintaining slow tempo and even rhythm. I was also working on my position, and I was trying to keep Kachina's focus through the sounds of hail and wind and cats bounding around the end of the arena. But the reality is, all I did was simple 20m circles at walk, trot, and canter.

It's sometimes hard to admit that this is where I'm at after so many years of riding, but that's the truth of horses, progress is rarely linear. I was truly very happy with Kachina and today's ride. The beauty and the curse of dressage is that so much work can go into something that outwardly looks so simple.

Monday, 15 February 2016

Another Dressage Weekend?

My lesson with Sandra (Dressage Weekend Part III) was so helpful, and had such impact with Kachina (Dressage Weekend Aftermath), that I knew I wanted to work with Sandra again.

Sandra teaches lessons through Skype, which is awesome, and I'm planning to take full advantage of it. However, I figured that it would probably be best to have Sandra meet Kachina in person to get a better impression of her before starting with Skype. Also, my friend KD was really wanting to get a schoolmaster lesson with Sandra and work with her horse too. This winter has been crazy mild, so hauling in February isn't looking as crazy as I first thought.

With all that said, KD and I have arranged (tentatively, based on weather) to haul our horses up to have a mini clinic weekend with Sandra on February 20-21.

Next week: Kachina and I here


The plan is as follows:

Saturday
haul up to Calgary
KD- lesson on her horse
Me- lesson on Kachina
KD- lesson on schoolmaster

Sunday
Me- lesson or Sandra training ride on Kachina
KD- lesson on her horse
Me- lesson on schoolmaster
haul home

Excited to ride this one again


Here are my goals for the weekend:

  • Give Kachina exposure to being hauled and ridden in a new place
  • Let Sandra meet and understand Kachina
  • Get Sandra's first impressions on Kachina's strengths, weaknesses, and potential for dressage (I'm not going to sell Kachina based on this or anything, I'm just really curious, and would like to compare my judgement of Kachina with the opinions of someone more accustomed to evaluating dressage prospects)
  • Start getting a feel for Sandra's teaching style so we can be more successful when dealing with the constraints of Skype lessons


I think those goals should be achievable. Anything else we achieve is bonus. While my goals are mostly Kachina-centric, I also threw in another schoolmaster lesson for myself, because A) I'm already there so why not?, B) last one was so fun, C) if we try something on Kachina that is less than totally successful, maybe I can try the same thing on Wrangler after and get a light bulb moment.

The other exciting thing about this plan is that KD and I have agreed to video/photograph each other's rides. I ride by myself 90% of the time and rarely get any photos of me riding so I look forward to having some media to share.

My most recent riding photo - July 2015


My plan is to cut out one show from the schedule this spring to pay for the February trip. I think it's totally worth it. I'm doing my taxes this weekend, so if I end up with a decent return it might go towards even more Dressage Weekends :-)

Sunday, 14 February 2016

Dressage Weekend Aftermath

I was hoping to do this post a week ago but I had to go out of town unexpectantly for a number of days and haven't been able to ride much.

Now that I've finally had a few of rides since my Dressage Weekend Extravaganza, here are my take-aways:

Meeting me at the gate

The biggest thing came from my schoolmaster lesson with Sandra. Shoulder-in is magical! (Note: At this point, I'm going to call all shoulder-in/shoulder-fore just "shoulder-in". I'm only starting it so I'm not really trying to differentiate).

I hadn't ever done much shoulder-in with Kachina as we were just starting lateral work and I figured it was too early. My lesson with Sandra taught me that shoulder-in might help the problems we were having with bend and straightness. I am completely amazed at what an immediate difference it has made!

1. If I'm working on bending Kachina's whole body in a banana shape around my leg, she automatically puts her head and neck on the correct bend instead of twisting her jaw out to the outside.

2. It really makes me ride inside leg to outside rein. I thought I was kind of doing this before, but apparently not really. You can't fake inside leg to outside rein when you're asking for shoulder-in.

3. I can use leg. Kachina has a tendency to shoot forward when I use any leg in any way (at least she's responsive?). Working on leg yields helped to teach her that leg sometimes meant sideways instead of forward, but it wasn't foolproof. When I'm working on shoulder-in, I have a frame where I can really use leg to push her "up" into contact instead of her shooting forward. I'm not entirely sure why I can't do this while going straight, but I figure it's a good first step.

4. It's a good exercise to get Kachina thinking but not stressed out, this means that it has been good for getting her relaxed.

A recent sunset


Obviously nothing with horses can be that easy so there are some things to work on. I have a tendency to get crooked in my body and hands while asking for shoulder-in. Also, we've only gotten as far as doing it successfully at walk at this point. Things to work on!


The position work is helping as well. While I'm riding I have new mantras drifting around my head, telling me to point my toes towards the horse's ears, keeping shoulders out, closing fingers, etc. Some combination of these things has helped me to have more effective half halts.

Kachina after her post-ride roll in the arena


Usually Kachina is so forward and sensitive that I can't ride with much leg. During my last ride I was actually able to use the shoulder in and half halts to get her into a slow trot where she was almost leaning on my hands. This might not sound ideal, but for Kachina, who tends towards fast and curling behind the contact, it was a welcome change. From this trot I was able to actually use leg and push her up into a lovely connected trot. It's probably the best trot I've managed to get in the last few months since I stopped having regular lessons. It was just a simple trot circle but I was smiling from ear to ear.

She frequently ends up with
creative "eye shadow" after a roll

Tuesday, 9 February 2016

What Makes a Horse Old?

I've read a few blog posts in the last couple months from bloggers talking about getting their horse's joints injected, needing to change warm-up routines to help with stiffness, evaluating what workload is appropriate, etc. I'm not interested in getting into the debates about what interventions should or shouldn't be done with horses, but it's had me thinking, what causes a horse to get physically old?

Note: By physically old, I mean having issues with stiffness or arthritis, or not being able to maintain fitness or good body condition, when a specific injury or illness isn't to blame.

The blog posts I mentioned are about horses who range in age from about 8 years old to 20 years old. When I was younger, I was basically taught that a horse over 20 is "old", but that maybe you should start being careful about not introducing new physical demands when a horse gets to be about 15 years old (e.g. not breeding a maiden mare after 15, not training a trail horse to jump at 18, etc.). However, there's obviously much more to it than that. You see some horses who are ridden and even compete well into their mid-20s, while there are other horses who need to retire as early teenagers.

These are the factors I can think of (in no particular order):

1. Age

How many years has it been since the horse was born?
This is the most obvious and self-explanatory. A 30 year old horse is going to generally have issues that a 3 year old doesn't.

2. Breeding

What breed is the horse? What bloodlines does the horse have?
Ponies generally live longer than draft horses, and longevity is a characteristic that can be bred for within breeds. However I don't know how much this impacts things by itself, or how much of it is tied to 3. below

3. Conformation

How big is the horse? What kind of conformation do they have?
See previous comment of ponies vs. drafties. Also, I know that if a horse has a conformational flaw, such as crookedness, it can put additional strain on the joint and result in earlier arthritis.

4. Workload

How often is the horse worked? How strenuous are the work sessions?
It make sense to me that a horse who is ridden hard 6 days a week might wear down faster than one who only does easy trail rides every couple weeks. However, considering pretty much all horses would spend more time in the stall, paddock or pasture than they do under-saddle, how much of an effect does this actually have?

5. Free time

What does the horse do in their off time? Do they amble around or do they run up and down the fence-line, playing rough with the neighbors? Do they live in a stall or a big field?
I've always learned that a "natural" horse lifestyle where the horse continuously takes small steps throughout the day is best for keeping joints healthy. But how much does this impact things overall?

6. Type of work

Does the horse jump large fences? Do sliding stops? Never go more than a walk?
I don't want to rail on other disciplines, but certain horse sports are harder on a horse's body than others. How high of a level of the sport is certainly a factor too.

7. Fitness and Nutrition

Has the horse been kept fit all their life? Are they fat or skinny? What nutrients does their diet include?
Getting into all the articles and ads about what supplements a horse needs is completely overwhelming. But how does this compare or counteract other factors? Also, I imagine an overweight horse would put stress on their joints the same way that happens with overweight humans.

8. Weight and Balance of Rider, Weight and Fit of Tack

How much weight does the horse have to carry? Is their movement inhibited by a pinching saddle or leaning rider?
I included these together, because a heavy rider isn't necessary as harmful to a horse's back as a lighter rider who bounces all over the place or an unbalanced set of heavy panniers.

9. Age of Being Started Under Saddle

How does being started too young effect a horse later in life? If a horse was never ridden until they turned 8, does that add on rideable years later?

Can you think of any other factors?

Often it might be hard to distinguish between some factors. For example, OTTBs are sometimes referred to as high-mileage, but as well as having a large work-load, racehorses mostly share similar factors of type of work, age of being started, breeding, and fitness, at least at the time they come off the track.

In my experience, I had a 20 year old anglo-arab mare who was in fantastic condition and not showing any signs of being old when I tragically lost her to colic. Other people frequently thought she was 10 or 15 years younger than she was. She never indicated any joint stiffness and looked great and felt great. However, the cause of her colic and her earlier founder were never determined despite testing, so maybe her digestive system was suffering from age in some unknown way. Ellie lived in a field as much as possible. Even when I couldn't ride much she would keep herself in fantastic shape by running around the pasture. She was started as a 4 year old, and was used to jump at first, and then as a low level pony club, 4H and dressage mount. She was ridden an average of 2-3 times a week for most of her life. (It feels weird to boil down Ellie's time with me into this little paragraph, I'll have to tell her full story on here at some point)

Ellie at 20 years young


Now, I now have a 13 year old grade mare. She wasn't started until the age of 8 and she had maybe 60 rides on her total when I got her 1.5 years ago. At the pre-purchase vet check, I was told that she looked great, and due to her low use, her joints were like a younger horse's. However, she is not super young by absolute age, and she is of unknown breeding so I don't have any information on that factor. This leaves me wondering how many years we might be able to work before she shows signs of "oldness". (I will of course keep an eye on how Kachina is feeling and looking, work with my vet, and act accordingly to her individual needs, but it's an interesting subject to think about)

Kachina when I went to try her - Age 12


The scientist in me knows that a sample number of 2 is not nearly adequate to make any conclusions. As much as I wish I could own hundreds of horses to do a more in depth report, my lottery ticket hasn't come up yet =P . So, instead, I will turn to the super scientific method of getting anecdotal information from the internet!

What factors do you think make the biggest difference in how physically old a horse is?

Friday, 5 February 2016

Dressage Weekend Part IV

Part I
Part II
Part III

Part IV - Sunday Simulator Lesson with Kerry

Sunday morning I woke up to a layer of fresh snow. Not much, but enough to make me glad I wasn't hauling! (My car has better winter tires than my truck)


View from my hotel room when I woke up
I drove out for another lesson with Kerry on the simulator. This session was really just building on our last session, so nothing earth-shattering. But we did discuss some new theories and I got some new hints on improving my position.

Theory


Think of the horse always being ridden in a corridor. It can be a straight corridor or a curved corridor but it's always a narrow pathway.

Think of the horse's back as a suspension bridge. If I let my body shift to either side I start to swing the suspension bridge and essentially that messes everything else up.

Aids for half pass and canter are similar. (I was really asking about this, because I want to make sure I develop a precise aid for canter now that won't be confused with other aids in the future) Move the inside leg farther forward for half pass than canter. Also for the half pass aid you are asking for it while bringing the shoulder over to the side with rein. Finally, the canter aid involves an up movement with the rider's hips and the half pass aid doesn't.

Pulling up the drive to the stables - mine were the first tracks in the snow


Position (some of this is repeated from Saturday's session)


- Don't push head/chin forward
- Elbows in
- Closed hands, including bottom two fingers
- Keep shoulders rolled back
- Stack blocks straight up
- Don't let lower leg turn out or move forward
- Shoulder-in aids were better today
- Half-halts better today
- Careful about not shifting to the right* - I was really struggling with this today, see end of post for why!

As well as transitions and position work, we played around with some of the simulator's other capabilities during this lesson.

Such an exciting photo that you get to see it yet again!


Tempis


We did some 3-tempi and 4-tempi changes for fun. This was good practice as I had to focus on both the counting and my position at the same time. When I got too focused on one part, the other would suffer. I won't be doing tempi changes in real life anytime soon but we all know that you frequently need to multi-task while riding a flesh and blood horse, so it was good to try and keep my position while worrying about something else at the same time. 

Passage/Piaffe


We played around a bit with passage/piaffe. This was purely for fun and won't really have any relevance to my real riding. We couldn't quite figure out what combination of aids was required to get piaffe out of the simulator but we did lots of passage. We also had a good laugh at some of the exaggerated things I was trying to do with my seat and legs to attempt to get the piaffe.

I got there a bit early so made friends with
one of the resident dogs while I was waiting


Test Ride


For most of the sessions we used the simulator program "Instruction Ride" where the screen just shows all of the sensor feedback and tells you what gait you're in. The simulator also has two other modes: "Free Ride" and "Test Ride". In these, there's actually a ring on the screen and you can steer and move around it, much like a video game. For the "Test Ride", it tells you at the top what movement you're supposed to be doing and you have to execute it reasonably successfully before it will let you move on to the next movement. I will say that the "tests" on the simulator do not even slightly resemble the USEF or Equine Canada tests - e.g. it made me do a canter serpentine with simple changes in training level. Again, like the tempi changes, the test ride was good practice at maintaining my position while paying attention to steering, instructions, getting movements at the right letter, etc. It was definitely distracting. I couldn't get the horse to rein back in a straight line for the life of me, and our simple changes resulted in a few halts, but I succeeded at staying in the ring and apparently that's more than most people manage on their first attempt at a test ride. I could see this mode being fun to play around with if I had more time on the simulator. 

Automated Training Ride


In Part I, I mentioned how we did an automated test ride to kick the weekend off. We did a second one at the very end to see if I had changed. My rogue right leg improved greatly! 

Day 1 for reference

Day 3


My seat was actually a little worse; however, when I got off at the end, I saw that my saddle was crooked on the simulator, which is probably why I felt like I was constantly being pulled to the right. On a real horse, when the girth is tightened on one side, it becomes tighter all the way around. However on the simulator, the left and right "girth straps" are fixed independently on either side. So when Kerry had well-meaningly tightened my "girth" half way through the session, it actually made it 2 holes tighter on the right than the left and was pulling my saddle off-centre. I take responsibility for not realizing and fixing this sooner. I'm frustrated with myself because I feel I wasted half the session fighting with my crooked position, when the problem wasn't my position at all. Oh well, chalk it up to a learning experience and a mistake I won't make again.

Beautiful property


Overall the weekend was very educational and fun. I think it's exactly what I needed to break out of the riding rut I've been in. I also have lots of new phrases that I can put in my Mantras =)

Have you ever ridden a simulator? Or taken another unorthodox approach to improve your riding?

Thursday, 4 February 2016

Dressage Weekend Part III

Part I and Part II

Part III - Saturday Schoolmaster Lesson with Sandra

This was the late addition to my Dressage Weekend Extravaganza, but actually the part I was most excited for. I knew the simulator would be great for working on my position, but I also realized that it wouldn't be the same as a real horse in terms of feel. I was super excited for the chance to ride an actual dressage schoolmaster and see what it felt like.

The drive from simulator stables to schoolmaster stables was full of beautiful
rural properties, huge houses, and views of the Rocky Mountains


Do you have schoolmasters available to ride in your area?

For me, I've never seen a horse available for lessons that had done more than 2nd level, and the price tag to buy horses of that level seems to start at $20,000. This made the prospect of riding a schoolmaster so much more exciting. 

When we were emailing back and forth to schedule the lesson, Sandra told me I'd be riding Wrangler, a 4th level Quarter Horse. Now I don't know about you, but I hear the name Wrangler, and I automatically assume a gelding. So, when I got to the barn on Saturday and was told we were going out to catch a mare named "Bissy", I was a bit disappointed. I thought that they had maybe switched me to a lower level lesson horse for whatever reason. This seemed even more the case when I saw how slowly this mare was plodding along while being led out of the field. 

But, you know what they say happens when you "assume". Luckily I didn't say anything, so I didn't actually make an a** out of myself. Turns out that what I heard as "Bissy" was actually "Pissy". Apparently Wrangler, the mare, earned herself the nickname of "Pissy Pants" as a young horse and it stuck. I still think it's fairly hilarious for this sweet, well mannered, 4th level horse to be called "Pissy".

Meet Wrangler, aka Pissy

(I think it's pretty cool that Wrangler is a quarter horse; seeing as my own horse is not from conventional dressage breeding {I don't even know her breeding}, it's nice to work with an instructor who doesn't have the opinion that big fancy warmbloods are the only way to go)

Sandra asked me some questions about my horse, our strengths and weaknesses, my riding history, why I like dressage, etc. Then we tacked up Wrangler and started the lesson.

Tacking up Wrangler - I didn't have time to take a more flattering photo
of her but you can see she's built pretty uphill for a quarter horse

We spent pretty much the whole lesson on a 20m circle in one end of the arena but worked on a number of things. We worked on improving the quality of the walk, and then trot, by keeping it active and constant rhythm. We worked on trot-walk transitions without losing energy. We worked on getting Wrangler on the bit by being playful/sponging with my hands and keeping active seat. When Wrangler is not on the bit she will stick her nose out in front with her neck down. Kachina on the other hand has a tendency to either giraffe or to curl behind the vertical, so this was certainly a change in feel for me.

We talked about stiff and hollow sides and worked on riding shoulder-fore in all three gaits. As Sandra was explaining it, I could really see from Wrangler's reactions how shoulder-fore is beneficial on both the stiff side and the hollow side but for different reasons. When the stiff side is to the inside, riding shoulder-fore helps to bend the whole body of the horse and therefore get the correct bend in the head and neck. When the hollow side is to the inside, riding shoulder-fore keeps the horse from pushing through the inside leg or leaning. This part of the lesson will be very relevant to bring back to Kachina as these are the problems we've been struggling with. Wrangler and Kachina even have the same stiff side (the left) so that simplifies things. We spiraled down to a 10m circle at the walk while maintaining shoulder-in, and then spiraled further down to make a 5m circle/walk pirouette.

Another thing we talked about was release of pressure. To keep a horse sensitive to my aids, I must release the pressure (either rein or leg) as soon as the horse responds correctly. Even if releasing means losing what you are asking for, it is better to release and then apply it again immediately. I've always known the importance of rewarding correct responses, but the particular idea about applying it again immediately was something to think about. I sometimes probably keep pressure on too long when trying to hold something for a couple steps but then keep the pressure off for too long after I give.

We did several walk to canter transitions. This was excellent practice for me to try out the "proper" canter aid I had learned from riding the simulator the day before (using inside leg, not just outside leg, being quieter with my seat, and returning my outside leg to the girth once we're in canter). With Kachina, I'm used to slowing her down in the trot before transitioning and then using a big obvious canter aid. It took a few tries for me to keep Wrangler active enough in the walk and using a subtle enough aid for us to get a good transition. It was amazing to feel what a good canter transition is supposed to be like though. It was very much "up" into canter instead of "forward". I've never really achieved that before. Working on the transitions also made me more aware of my hip position. Whenever I had the wrong hip forward it would confuse Wrangler. Maintaining the canter was a lot of work on Wrangler. To her stiff side I really had to keep my legs on Each.And.Every.Single.Stride. to keep her from breaking. And to her hollow side I really had to use inside leg to keep her from falling in. In either direction, the second I stopped actively riding she would go down to trot.

At the end of the lesson we did a couple of flying lead changes. Flying lead changes are something that I've never mastered. I had spent a fair bit of time working on them with my last horse Ellie, but it always felt like a bit of a chaotic mess and we could only get them successfully about 50% of the time. The aid for Wrangler to do a flying lead change is just to slide the old inside leg back (keeping pressure on while sliding). Even when my aid wasn't perfect, Wrangler knew what she was doing and gave me lovely uphill clean changes. She really did "jump" through the change. Sandra explained that changes have always been Wrangler's strength. I may not achieve changes that perfect on my own horse, but it still made me realize that every other change I've ever ridden was definitely too flat.

In regards to my position, the main thing Sandra was getting me to focus on was keeping my toes forward (sensing a theme for the weekend?). She worded it by telling me to "point my toes towards the horses ears". I find it fascinating how different ways of wording the same thing can make it click differently in your brain. Anyways, for some reason that idea of pointing my toes towards the horses ears really resonated with me and seemed to make it easier to act on.

We managed to squeeze a lot into a 40 minute lesson! Wrangler was the ideal schoolmaster ride, she was patient and never out of control, but she didn't do things automatically and so you had to ask correctly. She got lots of pats from me.

Another thing that I thought was nearly as cool as the lesson itself, was who I was sharing the arena with. It was a busy Saturday afternoon at the barn and a few upper level riders were riding at the same time as me. At home, my barn is pretty quiet, and the odd time I do end up sharing the arena, it's usually with a barrel racer or team roper. During Saturday's lesson, I was riding around horses doing canter half passes, full pirouettes, passage, etc. The horses themselves were gorgeous too. It was pretty awesome!

The arena, with the two high level riders who were working before my lesson started

As well as being a dressage instructor, Sandra is also a physiotherapist. She gave me a few stretches to do at home off the horse to help loosen my hips and allow me to keep my legs rotated in.

Overall it was a super educational lesson. I look forward to working with Sandra again soon with my own horse, and I hope to ride Wrangler again someday too.

Have you ever ridden a schoolmaster? What was your experience?

Wednesday, 3 February 2016

Dressage Weekend Part II

Don't worry guys, this one won't be nearly as long as Part I.

Part II - Saturday Simulator Lesson with Kerry

On Saturday I met Kerry for a lesson on the simulator. Kerry has been working with the simulator herself and with some of her students. She's relatively new to the simulator but has had a lot of success in the dressage ring on a number of real horses. This was my first time meeting her personally, but I scribed for some of her rides at the big shows last year so I knew she was a good rider. 

Kerry had a bit of a different focus from Nancy. She still used the simulator well but she would more frequently tell me that she didn't care what was happening up on the screen and instead look at my body directly to see what I was doing right or wrong. The simulator also has mirrors set up on either side and she was getting me to look in those a lot to see what my upper body was doing. 

We also had a few dressage theory discussions while halted. 
Some of her key theory concepts were:
- Think of the body as being made up of 5 blocks - 1. Head, 2. Shoulders/Chest, 3. Core/Seat, 4. Upper Legs, 5. Lower Legs/Feet. Think of always having those blocks stacked up in a straight line as that is where you will be strongest.
- Think of riding the horse inside a 12' box. You must ride the horse forward to the front of the box, but bring them back when they get strung out and leave the box.  
- The number one thing is rider position. The other number one thing is forward. After that comes bend, and then frame. 

This is the only photo I managed to grab of
the simulator, so you get to look at it again

Notes from Lesson with Kerry:


- keep hands closed always, even pinky finger
- Keep toes pointed forward always, and especially when giving aids
- Roll shoulders back but hold them wide and above the other blocks, not behind
- Keep elbows in and hands up and forward
- Don't lean back in half halt, think pinch shoulder blades together instead
- Keep upper body quiet while doing small scoops with my hips at the canter - things feel like they slow down and get quiet when I get it right
- Don't push my inside leg forward when asking for canter or shoulder-in
- Never let the horse give up my position
- Right leg position better than left
- Post the trot to slow down the tempo and use half halts to bring the horse back to the 12' square
- Don't push chin forward while scooping canter
- Don't let a reactive horse make me ride without legs on
- Stirrups are a good length for me

Tuesday, 2 February 2016

Dressage Weekend Part I

I'm back from my Dressage Weekend Extravaganza. It was everything I hoped it would be =)

I'm going to break this down into 4 parts, one for each lesson, so I can break down what I learned in each. Part I will also describe more about the simulator itself for anyone interested.

Part I - Friday Simulator Lesson with Nancy


I drove up to Calgary on Friday afternoon and arrived with just enough time to check into my hotel and change into riding clothes before driving out to the barn with the simulators.

I met Nancy who gave me my first simulator lesson. Nancy is the owner of the property and the simulators. She used to operate her barn as a boarding and breeding stables but it's now a lovely large private facility just for her own horses. She converted her large foaling stalls into rooms for the simulators. There is a dressage simulator and a jumping simulator. I only used the dressage one, but apparently the jumping one is a completely different experience and quite fun. The simulators have been in Alberta for over a year now, but they haven't been widely promoted and so they are relatively unknown even in the immediate area. As far as I know, these are the only ones in all of Canada.

The home of the simulators

My simulator sessions on the weekend were split between Nancy and Kerry. Essentially, Nancy is a simulator expert but not a dressage expert, while Kerry is a dressage expert but not a simulator expert. This made for two different, but highly complimentary experiences.
(Note: because it's the internet, I'm just using first names for any trainers I ride with, but if you're in the area and would like more information about who I'm talking about so you can get some awesome lessons for yourself, just send me a message and we can talk)

Automated Training Ride

The very first thing we did was a test ride. This takes two minutes and consists of the simulator moving at all three gaits while I was directed to just sit there. This took place before any of the sensors were explained to me or before I was given any feedback on my position. The idea of this is to get a baseline of what your position is like.

After the two-minute automated ride, we reviewed my results and talked about the sensors in the simulator.

My initial test


I was pleasantly surprised to find out that my seat was fairly quiet and centered. I was shocked and horrified to find out that my right lower leg was apparently pressed against the horse almost the entire time without me realizing it. I have been struggling with Kachina falling in and being counterbent while going to the left, and this may totally be because my right leg is inadvertently pushing her in.

To be fair, my right leg wasn't nearly as bad for the rest of the weekend as it was for the first two-minutes. This is definitely partially because I was made aware of it, but it also may have been a slight flukey thing in the first place. Either way, it's valuable information to know that this happens at least sometimes.

About the Simulator

The simulator I rode was the dressage simulator made by Racewood. More info available here.

The simulator consists of horse shaped machine that moves and has sensors, with a screen in front of you that shows feedback as to what you're doing. I brought my own saddle to put on the simulator.

The simulator, my saddle on board

Sensors

The simulator has the following sensors:
- 3 pads on each side of the horse, corresponding to different lower leg positions
- rein pressure on mouth
- turning of head (essentially inside rein)
- turning of neck (bend supported by outside rein)
- seat sensors that are sensitive to degree of pressure, as well as variations side to side and front to back

Seat Sensor

The seat sensors are, in my opinion, the coolest part of the simulator. It is visually shown as a big circle with a red dot. Ideally, you want a small red dot right in the middle of the circle. The position of the red dot shows if you are shifting your weight towards the front, back, left, or right. The size of the red dot increases as you increase pressure. This increase could be due to hitting the saddle with your seat if you're out of time with the motion or bouncing. Squeezing with your upper legs would also show a change to this sensor. Finally, the increase could instead be due to intentionally applying your seat as for a half halt.

I found this fascinating. For years I have successfully influenced horses with my seat, but I always found it slightly mysterious. Seeing a dot immediately move and grow relative to how I was holding my seat or upper legs made it more concrete to me as to what it was I was doing and how it effects the horse.

For me, I discovered that my seat was generally pretty good, but the dot grew as I was concentrating on fixing my lower legs or hands as that is when my hips and core would tense up and stop following the motion.

Gaits and Transitions

The simulator has the following gaits:
- rein back
- halt
- collected walk
- medium walk
- working trot
- medium trot
- collected canter (both left and right leads)
- medium canter (both left and right leads)

Transitions could be done between adjacent gaits, or by skipping gaits. However, your aids had to be precise to get the transition you wanted. Getting a feel for the transitions was the biggest adjustment needed when first using the simulator.

Down transitions should be done by using a half halt with your seat and hands at the same time. If you didn't have good timing with your half halt, nothing would happen, but if you used your hands too much, the simulator would immediately fall into an abrupt halt. Through this, I learned that I do not apply my seat and hands at the same time in a half halt, which makes them less effective. I would try half halting repeatedly to get a down transition, keep failing, and then try stronger which would result in a halt. We practiced this lots, and I did improve considerably.

Up transitions were generally easier, but if you have a tendency to swing your lower leg forward, it will completely miss the sensor when you try and use leg and nothing will happen (ask me how I know!)

Aids

As well as the various gaits, the simulator can also do:
- flying lead change
- leg yield
- shoulder in
- half pass
- piaffe
- passage
- pirouette

In order to get each movement, a particular combination of aids is applied. For example, to get a shoulder in, you need to have head and neck bent to the inside while applying inside leg at the #1 position (at the girth) and outside leg at the #2 position (slightly back). This is a bit unrealistic as an actual horse can have more variation, but it was extraordinarily useful for me to learn some of the "proper" aids. Most of my dressage experience has been on just one horse that I trained myself, meaning we could do the movements but it was sometimes done with an unconventional aid that we both just understood. Since we could get the correct result, I never had an instructor tell me I was doing it wrong. In particular, my aids for canter and for shoulder-in were incorrect. I had an inkling of this from reading some dressage articles recently, so I used this weekend to swallow my pride and figure out what exactly I should be doing instead. Now that I'm working with Kachina, I want to teach her the more universal aids for the movements.

Other notes about the simulator

- they adjust the machine at the start of each session to your weight, so seat pressure is more relative and meaningful
- the simulator's trot and canter is much slower and smoother than any real horse I've ridden, so just because you can sit quietly and well here doesn't necessarily mean you'll be great on any horse
- due to the smoothness and slowness, posting the trot doesn't work well. This was a little disappointing to me as I know that these days my position is actually better when sitting the trot than posting

Things for Me to Work On

These are the things I learned from Nancy and the simulator on Friday night:

- Make sure I'm not inadvertently using my right leg
- Half halt with reins and seat at the same time
- Count 1-2-3 before each half halt to prepare
- Canter aid is inside leg at girth (=go) and outside leg back (=correct lead)
- As soon as I ask for the canter, bring my outside leg back to the home position
- When I turn my toe out to give an aid, it throws my whole leg out of position and results in my lower leg sliding forward, keep toes forward!
- Seat pretty good, except immediately after transition
- Reins messy in transitions
- Shoulder-in aid is inside leg at girth and outside leg back in #2 position - I am supposed to control the outside hip with the outside leg and bring the outside shoulder around by using my outside rein
- Flying change is outside leg back only

Nancy was wonderful to work with and chat to. We were both having so much fun that we didn't realize that we went a full 40 minutes over time! 

Tomorrow: Part II!